Showing posts with label Shabby Chic. Show all posts

Saturday, August 19, 2017

The Amazing Paper Grace Thinking Outside of the Box Blog Hop

♥♥ For Newer Posts, Please Scroll Down ♥♥


We're so excited!  For months we've been bringing you creative ways to use your dies to make stunning cards.  Not today!!  Today, we're showing you how to make anything but a card.  Becca issued the challenge that the creative team could pick any die and not use it in the way in was originally intended. What that means for you is everything we are showing today is pretty much outside of the box.  Dies are meant for this kind of inspiration and as you hop around, you'll be amazed at some gorgeous creations that will have your head shaking.  Yes there are prizes, but but have your gift list sitting by so that you can pick out the next gifts you might be making for someone special.

I'll tell you a little bit about my creation and will share a link list below so that you can see the creations of each person on the Creative Team as well as information on how three lucky people can win Amazing Paper Grace Dies.


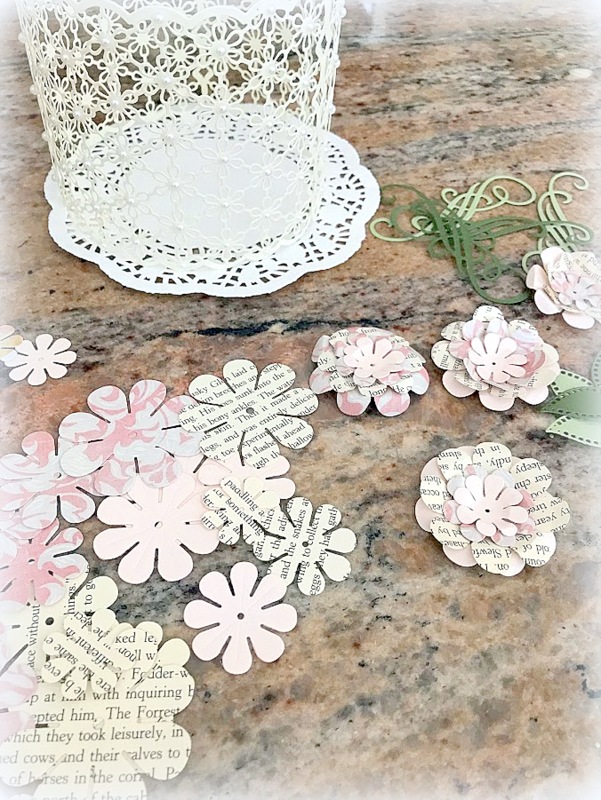
I first started by die cutting 3 panels with the Spellbinders Emmeline Treillage Dies


Then using some Glossy Accents, I glued them together with just a little glue on each end of the die cuts, forming a circle. 


Then die cut some flowers from the Cinch and Go Flowers and Cinch and Go Flowers Two Dies. (From the Cinch and Go Flowers Die Set, I only used the larger flourish die. The flowers and leaves were made with the Cinch and Go Flowers Two Set.)  Hot glue the circle to a paper doily. (for added strength, add a circle of strong cardstock or cardboard underneath the paper doily.) Then just simply, hot glue them to the front of the lantern. Add a battery operated candle and you're good to go! 


This was super easy and fun to make! They would make great centerpieces for a wedding or shower.


The flowers could also be changed up to snowflakes for a fun Christmas/Winter centerpiece.


How to Win:
Hop around to each Creative Team Member and leave a comment on each blog, three lucky winners will win a die of their choice from the Amazing Paper Grace Vintage Elegance Collection.    In making the rounds, a comment should be left on the August 15th Blog Post of each Creative Team member - in your comments let us know if there is a project you would consider making.  

When to Check Back:
We'll pick and post a winner on Saturday August 19th on the Amazing Paper Grace Blog.

How to Claim:
The winner has two weeks from the time the blog post is published to claim their die.  Simply click on the contact tab at the top right hand corner of the Amazing Paper Grace blog, leave your mailing address and type the name of the die you'd like.  Becca will be sending out the winning die.  Please give us a month, we'll get it to you, promise!

Who can Play:
Any of our lovely readers including our international friends.

To start thinking Outside of the Box, hop to:Visit Becca      -  at amazingpapergrace.com/blog/
Visit Melissa  – at keepsakesbymelissa.blogspot.com
Visit Teresa    -  at victorianpaperqueen.com
Visit Anita      – at craftingforever-anita.blogspot.com
Visit Kristi      – at kristispapercreations.blogspot.com
Visit Joanna   – at joannakrog.blogspot.com

P.S.  These are all gifts you can make, yes you!! Please feel free to ask questions of all the designers in their comments because we all love to mentor readers through making wonderful gifts for their families.

Have fun hopping around!! ;)


hugs...


Saturday, June 24, 2017

♥ Sweet Rustic meets Venise Lace ♥


Hello there! Happy Saturday to you! Stopping in today with a sweet card I made with the new Spellbinders S5-311 Emmeline Treillage and S4-789 Francesca Label Dies by the amazing Becca Feeken from Amazing Paper Grace. These dies are from the NEW Venise Lace Line. The entire line is just gorgeous!


These beautiful papers are from the Sage and Grace Paper Pad by KaiserCraft. Love the rustic yet elegant look of them! They go so well with these stunning Dies!! The butterflies, clock and heart are from the Sage and Grace Die Cut Shapes.


It's finally starting to look like Summer around here! The boys are now out of school. So let the fun begin!! :)


 Hope you have a sweet day filled with precious memories!

hugs...


Wednesday, April 5, 2017

♥ A Shabby Simon Says Stamp Birthday! ♥


Hello! We have an exciting challenge this week at the Simon Says Stamp Wednesday Challenge Blog! It's our 8th Birthday! So we want to see those...Birthday Cards!


The Simon Says DT are showcasing our very own Simon Says Stamp Exclusive Products on our cards this week. I am using the Dot Scallop Border Die and the It's Your Birthday Clear Stamp Set. Simon Says Stamp has lots of Exclusive products for Birthdays! You can see them all HERE! ;)


The papers I used are from the PhotoPlay French Flea Market Paper Pad. Such pretty, shabby chic papers. I finished off the card with some seam binding ribbon, May Arts Natural Twine, a Prima Rose, lace trim and some pearls.


The super sweet and generous Heidi is giving away NOT 1, NOT 2 BUT 8 $50 Credit Vouchers to 8 lucky random winners of this challenge to the Simon Says Stamp Superstore! Good luck everyone!


Do you use Instagram ?  If so, please add #ssswchallenge to your challenge entry uploads so we can see them on there too. 


Hope you have an amazing day!

hugs...


Wednesday, November 23, 2016

♥ Simon Says...Christmas to Die For ♥

Hello! Happy Thanksgiving Eve! And Happy Wednesday! We have a new challenge up at the Simon Says Stamp Wednesday Challenge Blog! This week we want to see Christmas cards with a die cut on it!


The Simon Says DT are showcasing our very own Simon Says Stamp Exclusive products! I am using the Snowflakes for the Season Die Set as well as the Believe Clear Stamp Set. I can use both of these products over and over again! The stamp set has so many different phrases in it. So fun! And those snowflake dies....LOVE!!


The papers I used are from the Sweet Peppermint 6x6 Collection Kit by Prima. I added some Diamond Dust Glitter to the snowflakes and some Glitter Snow to the card as well.


I finished up the card with some pink satin ribbon and some Cosmopolitan Sequins from Lucy's Cards.


And don't forget, the super sweet and generous Heidi will give the random winner of this challenge a $50 Credit Voucher to the Simon Says Stamp Superstore! Good luck everyone!


Do you use Instagram ?  If so, please add #ssswchallenge to your challenge entry uploads so we can see them on there too. 


I want to wish you all (here in the U.S. and abroad) a very Happy Thanksgiving!

                             Image result for thanksgiving clip art free
hugs...


Saturday, December 19, 2015

♥ Vintage Paper Ornament ♥

Hello! Can you believe Christmas is less than a week away? I'm stopping in today with a quick and easy place card setting you can make to dress up your holiday table. It is a little paper ornament that only takes minutes to make.


I used some beautiful collages from the iralamija shop on Etsy to make it. I used 4 different collages to make this and the total cost would be $17.35 for all 4. And since these can be printed over and over again, you can make endless "paper ornaments" for under $20! To get started, I re-sized the Christmas Strips Collage simply using Microsoft Word (you can use any photo editing software) so that the strips were longer and skinnier than they would normally print out.


Then using a hot glue gun, make a circle out of one of the strips.


Then adhere another strip around the first circle.


Continue adding "circles until you make a ball. You can add as many as desired. I just used the 6 strips that were included. Adhere a "base" to the bottom of your ornament using a punched or die cut scallop circle.


Then decorate as you wish! I used the Christmas Story Collage (which a name can easily be added to any of these images using either a printer and a marker or pen), Vintage Christmas Tickets and the Christmas Expressions Collage.


I finished it off with some hand dyed seam binding and pearls. Before completely closing up the ornament, you could also put a little battery operated tea light into each one for a wonderful effect on your holiday table! They would make just some simple decorations on any table or you can even leave off the "base" and hang them on the tree.


I hope you stop by the iralamija shop for some beautiful vintage and shabby chic designs!


Hope you all have a wonderful Christmas!!

hugs...


Monday, December 7, 2015

♥ Vintage Christmas ♥

Hello there! Stopping in with a couple of vintage inspired Christmas cards made with some sweet collages from the iralamija shop.


Not only are these collages beautiful but they are great when you have to make a card quickly or you have to make a lot of them! They are so easy to work with and they look so pretty! ;) For one low price, you can make endless cards!!


Hope you visit the iralamija shop today! You won't be disappointed!

Have a lovely day!

hugs...