Showing posts with label tutorial. Show all posts

Wednesday, October 7, 2015

♥ Splitcoaststampers 3D Pumpkin Tutorial ♥

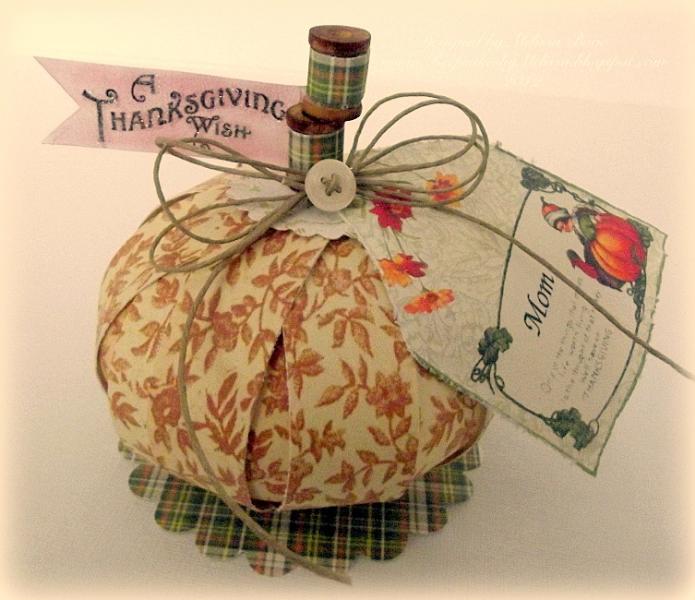
Hi there!! Today I have a new tutorial up over at Splitcoaststampers! It is to make a 3D Pumpkin Place Card Setting! Here is a pic of one that I made yesterday in non-traditional colors. I used some vintage ephemera paper from the iralamija shop. And it only took me 15 minutes to make.


How cute these would look on your Halloween Party or Thanksgiving Table! And your guests can take them home as a little party favor!


This is one I made awhile back.


Stop by Splitcoaststampers HERE to see how easy they are to make! :)

Have a sweet day!

hugs...


Thursday, July 18, 2013

♥ Rose Tutorial ~ Crafty Secrets Style! ♥

♥ Ok. I really need to learn how to make videos and upload them! It would be so much easier for me to show a tutorial! :) Anyone have any pointers or suggestions?? ♥

I wanted to show you a fun and really simple way to make a paper rose. I used some of the new Printable Papers by Crafty Secrets. Let's get started.


I first printed out a double sided paper by printing on 1 side of cardstock and then reloading it into the printer and printing on the other side. For this particular rose I used the Wild Roses Paper Set. Next punch, die cut or hand draw a six petal flower.


Next you will draw a line from each "corner" across to the other on the back of the flower. On a 6 petal flower, there should be 3 lines.


Next, you will cut on 1 line to the center of the flower on only 1 flower. Then on the 2nd flower, you will cut on 2 lines, which will remove 1 of the petals. Then on the 3rd flower, you will cut on 2 lines but leaving a line in the middle uncut, so you will remove 2 petals that will form a heart. Following me? I hope so. Ink the edges with brown ink.


Now you will add some hot glue to 1 petal and you will fold it under the next petal. Repeat for the other 2 flowers. This will form a cone like flower.


Using a little stick, like from a cotton swab, roll the edges of the flower petals over the stick. (In the photos, I did it before I glued the flowers together but it is easier to do afterwards!)


Roll the 2 little pieces loosely around the cotton swab as well. These will be the flower center.


To make the flower assembly easier, cut the "cone shaped" bottoms off all of the pieces.


Now assemble the flower starting with the larger flower. Adhere it with hot glue onto a small punched or die cut circle.


Next adhere the 2nd largest and so on, finishing up with the 2 small pieces, 1 going inside of the other.


And there you have a fun and easy paper rose. It really is! Give it a try!!


For my card, I also used the Embossed Pink and Yellow Paper Set, Embossed Yellow and Green Paper Set (Green), Rose Swirls Paper Set (Blue), and the Ephemera Ad paper is from the Garden Papers Set. Birthday Wishes is from the Garden Girls Digi Stamp Set.


Have a sweet day! I will announce my 2 winners from my GDT post from the Simon Says Stamp and Show Monday Blog shortly!!

hugs...

Sunday, July 14, 2013

♥Simon Says Stamp and Show GDT and Tutorial and a Giveaway! ♥

♥This will remain on top until end of week! Please scroll down for new posts! Thank you!♥

Today I am Guest Designing at the Simon Says Stamp and Show Challenge Blog! They have the BEST Vintage style challenges around and this week's challenge is called "A Little Stamping"! You can use either a small stamp on your creation or use a stamp in some small way. Get creative and have fun!!

I actually didn't use a small stamp, by any means, or either stamp in a small way! But I have a fun tutorial over there on how to use Bleach with your images! It's so easy and fun and gives great highlights to stamped, embossed images using household bleach.


These are sneaky peeks of 2 of the cards I made. To see them in full, please visit the Simon Says Stamp and Show Challenge Blog.


I f you leave me a comment both here on this post and 1 over on the Challenge Blog, you will have 2 chances to win a fun, vintage inspired Surprise Goodie Bag from me! And if you join in on the challenge, I will give you an extra chance! Just let me know you joined it by leaving me your Entry #. You can join the latest challenge HERE! Easy Peasy!! Good luck and more importantly, have fun!

And before I go, I want to give a special thank you to May Flaum, the DT Leader, over at the Simon Says Stamp and Show Blog! I had so much fun coming over to the "Vintage Side"!! Thank you for having me!

hugs....


Monday, July 8, 2013

♥ Simon Says Stamp and Show GDT ♥

♥ This was supposed to Auto-Post this morning! Yeah Right!! Blogger!!! ughh! ♥

Happy Monday everyone!! I hope you all had a glorious weekend! This week I am Guest Designing for the Simon Says Stamp and Show Challenge Blog! Yes, I am on the Simon Says Stamp DT but this is the Vintage Challenge Blog for Simon Says that I'm GDT for! I am super excited about it too! Love my vintage!!


I am just showing you a little sneaky peek, for now, of 1 of my cards. I will have a full tutorial for Stamping with Bleach Out images, on the Simon Says Stamp and Show Challenge Blog on Wednesday!


So make sure you stop by there on Wednesday and leave me some love! I will have a Giveaway from a "Random Comment" on both the Simon Says Stamp and Show Blog and mine from comments on Wednesday's posts! The winners will receive a special Goody Bag from me!! :)

Oh, and please stop by the Simon Says Stamp and Show Blog now to leave some love for the Super amazing DT over there! Such talent!!

Have a great day/night!

hugs...