Showing posts with label Rose. Show all posts

Wednesday, March 8, 2017

♥ Simon Says...For A Special Lady/Girl ♥


Happy Hump Day! We have a brand new challenge starting today at the Simon Says Stamp Wednesday Challenge Blog! This week we want to see cards for...A Special Lady and/or Girl! 


The Simon Says DT are showcasing products by Penny Black! I am using the Red Blush Cling Stamp on my card. Such a pretty stamp. I stamped it with some Jet Black StazOn and then colored it in with some Gelatos. I then brushed on some Clear Glitter with my Wink of Stella Marker to give it some sparkle.


The papers I used are from the Almanac Paper Pad by Prima. I also used the Wonky Stitches Die Set by Avery Elle, some Hero Arts Mixed Accents (pearls) and some hand-dyed seam binding ribbon. The "Thinking of You" is from an old stamp set "Prayers" by Simon Says Stamp.


And don't forget, the super sweet and generous Heidi will give the random winner of this challenge a $50 Credit Voucher to the Simon Says Stamp Superstore! Good luck everyone!


Do you use Instagram ?  If so, please add #ssswchallenge to your challenge entry uploads so we can see them on there too. 


Today is my oldest sons 11th Birthday! How time flies!! I can't believe he is 11 already! Feels just like yesterday that he was born! He is the most loving and sweet kid! He makes us proud everyday. Happy Birthday Antonio! We love you very much!!


Have a sweet day!

hugs...


Tuesday, August 27, 2013

♥ JustRite Guest Designer ~ Day 2 ♥

Hi everyone! I'm back with a sneaky peek of today's card for JustRite. I always find it hard to make Sympathy cards. But with the With Sympathy Clear Stamp Set by JustRite, it is easy peasy! Such a beautiful stamp set!!

♥ ETA: I forgot to mention that I colored in the Roses with some Distress Markers by Tim Holtz. If you never tried them before, run don't walk to the store or your computer to buy them!! They are AMAZING!! By far, better than Copics, in my opinion! ;)  I only used 1 marker to color in the leaves. I would need 3 Copics to do that. And they are priced so much cheaper too! You can get them HERE at the Simon Says Stamp Store! :)  ♥


To see the card in full, please visit the JustRite Inspiration Blog!


Have a sweet day!

(I'll be back shortly with a fun Crafty Secrets card and some pics of my newly remodeled Craft Room!!)

hugs...


Monday, May 6, 2013

♥ Shabby Decoupaged Stacking Boxes ♥ {And CS May Linky Party!}

Today is the first Monday of the month...so that means it's time for a new Crafty Secrets DT Challenge and May Linky Party! We would love for you to join in on the fun! Just link any type creation using a Crafty Secrets product at the Heartwarming Vintage Blog and you could win a $50 gift certificate to the Crafty Vintage Girl Store! You have until Sunday the 12th!!


This month we are having a super fun DT Challenge! We were all asked to make something using a different technique. I am making fun things using Decoupage! I must admit though, I never did it before. And guess what?? I am addicted! I love it! I am looking for things to decoupage everywhere! My kids better watch out, I may decoupage them! LOL
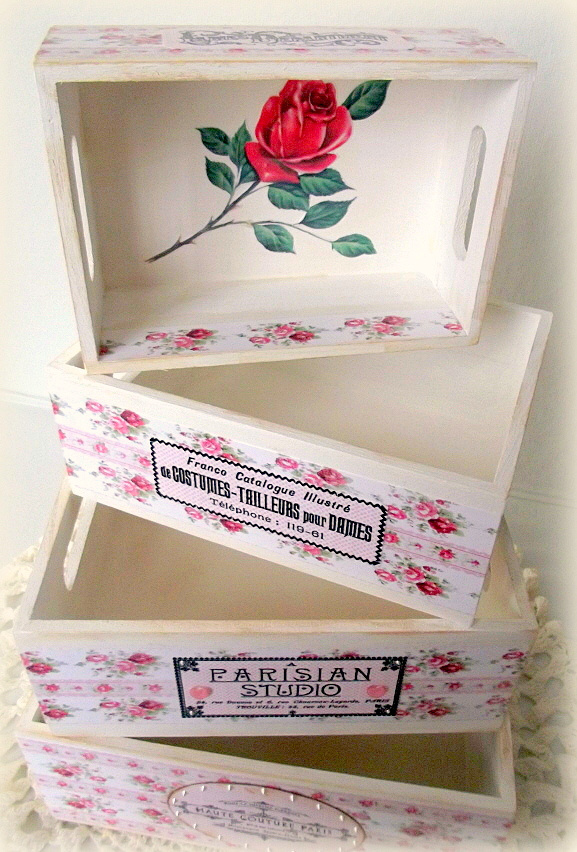
I decided to make some shabby chic rose nesting boxes using decoupage. They go perfectly in my newly decorated shabby chic craft room! They are so easy to do and look beautiful sitting on a table just stacked with nothing in them or filled! Here's how to make them!


The Nesting Boxes I purchased are from Michael's. They were only a few dollars for all 4 of them! I first painted them white, using only 1 coat of acrylic paint, since I wanted a shabby look to them.


While they were drying, I printed out some beautiful rose paper from the Radiant Paper Collection and some labels from the Sew Fashionista Digi Stamp Set. I printed everything out on simple white cardstock.


After the paint has completely dried, spread a generous amount of Mod Podge onto the front of the box, where the paper will go.


Using a ruler, carefully run it over the paper to remove any excess glue and air bubbles. Then apply more Mod Podge in the center of the paper and apply Label. Repeat, using ruler.


Now apply a layer of Mod Podge over the paper and label. When dry, apply a second coat.


For the top box, I added a rose (from the Vintage Valentine Kit) to the inside, bottom of the box.


There you have some wonderful, shabby chic stacking boxes that you can display proudly! Just think of the possibilities for these boxes! Crafty Secrets has so many wonderful themes you can choose from to create something special with! Think Christmas, Valentine's Day, Easter, Spring, etc...


Now, don't forget to check out the rest of the Crafty Secrets DT to see what they have created with their special technique!!

                                                      ♥ Vicki Chrisman ~ DT Leader
                                                      ♥ Michele Kovack
                                                      ♥ Darlene Pavlick
                                                      ♥ Rebekah Fairies
                                                      ♥ Sheila Rumney

Oh, and before I forget, right now Crafty Secrets is having a HUGE sale!! You can save 30% off all Regular and Digi Products at the Crafty Vintage Girl Store! Hurry! You only have until this Wednesday, the 8th!! :)


Have a sweet day!

hugs...
         

Monday, September 5, 2011

♥ Pink Wedded Bliss ♥

This week's challenge at The Shabby Tea Room is called "Pink Wedded Bliss". And there are not 1 but 4 lovely inspiration photos for you to choose from! Just make a card and/or project with a Wedding or Anniversary theme and the colors from the inspiration photos.


For my card, I used the beautiful Rose digi stamp from our wonderful monthly sponsor, Robyn's Fetish. I colored it in with some Copics and added some glitter for some sparkle. The gorgeous papers I used are new ones from Simple Stories called "Baby Steps". They are so beautiful!! (One of my new faves!)


I finished my card with some pink satin ribbon, a Jenni Bowlin stick pin, some punched MS butterflies, Rouge Liquid Pearls, black adhesive pearls, a paper doily and the stamped sentiment is from Studio G. This card could probably be used for both a Wedding or an Anniversary.  

This week's challenge winner will receive 5 Digi Images of their choice from Robyn's Fetish!


Here is 1 of 4 inspiration photos for you!


Don't forget to visit the rest of the Shabby Girls too!

Debbie Marcinkiewicz - {TSTR Creator} - Simple Treasures
Pattie Goldman - The Pampered Paper Patch
Danielle Greenwood - Au Claire De La Lune
Charlene Cundy - Expressions of Me!
Sheri Holt - My Sheri Cards

Have a wonderful day! And a Happy Labor Day to everyone in the U.S.! My son starts Kindergarten tomorrow and my tummy is in knots!! His is fine, it's mine that is upset!! :)